二叉树的先序、中序和后序遍历
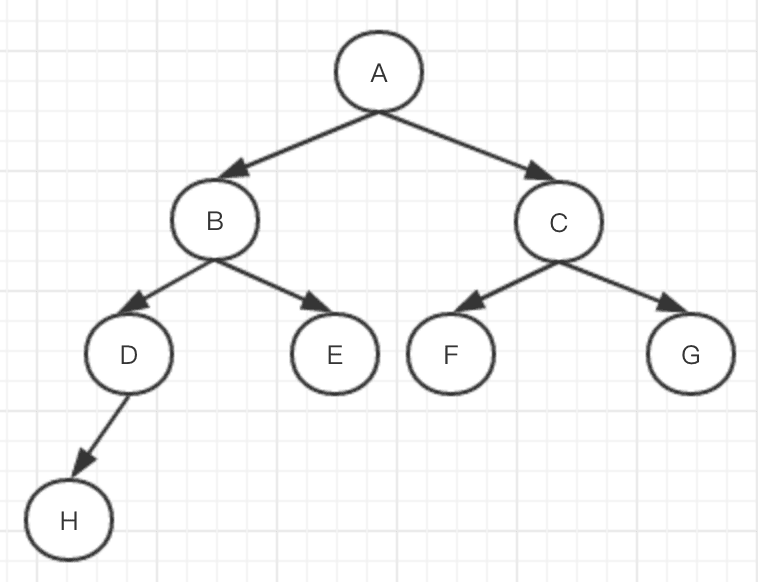
二叉树是什么?
- 树中每个节点最多只能有两个子节点
- 在JS中通常用Object来模拟二叉树
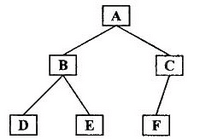
先序遍历算法
- 访问根节点
- 对根节点的左子树进行先序遍历
- 对根节点的右子树进行先序遍历
- 对应上图即为:A-B-D-E-C-F
我们先建立一颗二叉树
// 二叉树 bt.js
const bt = {
  val: 1,
  left: {
    val: 2,
    left: {
      val: 4,
      left: null,
      right: null
    },
    right: {
      val: 5,
      left: null,
      right: null
    }
  },
  right: {
    val: 3,
    left: {
      val: 6,
      left: null,
      right: null
    },
    right: {
      val: 7,
      left: null,
      right: null
    }
  }
}
module.exports = bt;
先序遍历(递归版)
const bt = require('./bt');
const preorder = (root)=> {
  if(!root){ return; }
  console.log(root.val)
  preorder(root.left);
  preorder(root.right);
}
preorder(bt);
// 1 2 4 5 3 6 7
先序遍历(非递归版)
// 先序遍历(非递归版)核心思路用堆栈,因为在函授中调用另一个函数其实就是连续的调用堆栈,即递归版的原理
const bt = require('./bt');
const preorderPlus = (root) =>{
  if(!root){ return; }
  const stack = [root];
  while(stack.length){
    const n = stack.pop(); // 最开始访问根节点的值,循环到以后就是部分子树的根节点
    console.log(n.val);
    // 栈:后进先出 所以需要先推right
    if(n.right){// 递归右子树
      stack.push(n.right);
    }
    if(n.left){ // 递归左子树
      stack.push(n.left);
    }
  }
}
preorderPlus(bt)
// 1 2 4 5 3 6 7
中序遍历算法
- 对根节点的左子树进行中序遍历
- 访问根节点
- 对根节点的右子树进行中序遍历
- 对应上图即为:D-B-E-A-F-C
中序遍历(递归版)
const bt = require('./bt');
const inorder = (root)=>{
if(!root){ return; }
inorder(root.left);
console.log(root.val);
inorder(root.right);
}
inorder(bt)
// 4 2 5 1 6 3 7
中序遍历(非递归版)
const bt = require('./bt');
const inorderPlus = (root)=>{
  if(!root){ return; }
  // 核心思路:遍历所有左子树->根节点->右子树
  const stack = [];
  let p = root; // 指针
  while(stack.length || p){ // 循环1,2,3,4
    while(p){
      // 1.把所有子树丢入栈中
      stack.push(p);
      p = p.left;
    }
    // 2.弹出最尽头的节点
    const n = stack.pop();
    // 3.访问最尽头的节点
    console.log(n.val);
    // 4.访问右节点(指针指向右节点)
    p = n.right;
  }
}
inorderPlus(bt)
// 4 2 5 1 6 3 7
后续遍历算法
- 对根节点的左子树进行后续遍历
- 对根节点的右子树进行后续遍历
- 访问根节点
- 对应上图即为:D-E-B-F-C-A
后序遍历(递归版)
// 后续遍历的实现
const bt = require('./bt');
const postorder = (root)=>{
if(!root){ return; }
postorder(root.left);
postorder(root.right);
console.log(root.val);
}
// postorder(bt)
// 4 5 2 6 7 3 1
后序遍历(非递归版)
const bt = require('./bt');
const postorderPlus = (root)=>{
  // 核心思路:
  // 1. 把后续遍历的顺序倒置(左右根->根右左,与先序遍历很像)
  // 2. 把先序遍历的访问操作,改成入栈操作
  // 3. 利用栈的后进先出特性,子节点逆序输出
  if(!root){ return; }
  const outputStack = []; // 做倒置操作的堆栈
  const stack = [root]; // 函数调用堆栈
    while(stack.length){ // 根右左
      const n = stack.pop();
      outputStack.push(n);
      if(n.left){
        stack.push(n.left);
      }
      if(n.right){
        stack.push(n.right);
      }
    }
    while(outputStack.length){ // 倒序输出
      const n = outputStack.pop();
      console.log(n.val);
    }
}
postorderPlus(bt)
// 4 5 2 6 7 3 1